こんにちは、花田です。
梅雨に入りましたね。雨は苦手です。
今年から初めてGCPを触るようになりました。
クラウドサービスは便利ですね。
今回はCloud Functionsでエラー通知を行う際に詰まった箇所を書いていきます。
現在も開発中なので最終結果は変わるかも知れませんが、現在に至るまでの過程を書いて行こうと思います。
概要
対象サービスについて
サービスについて
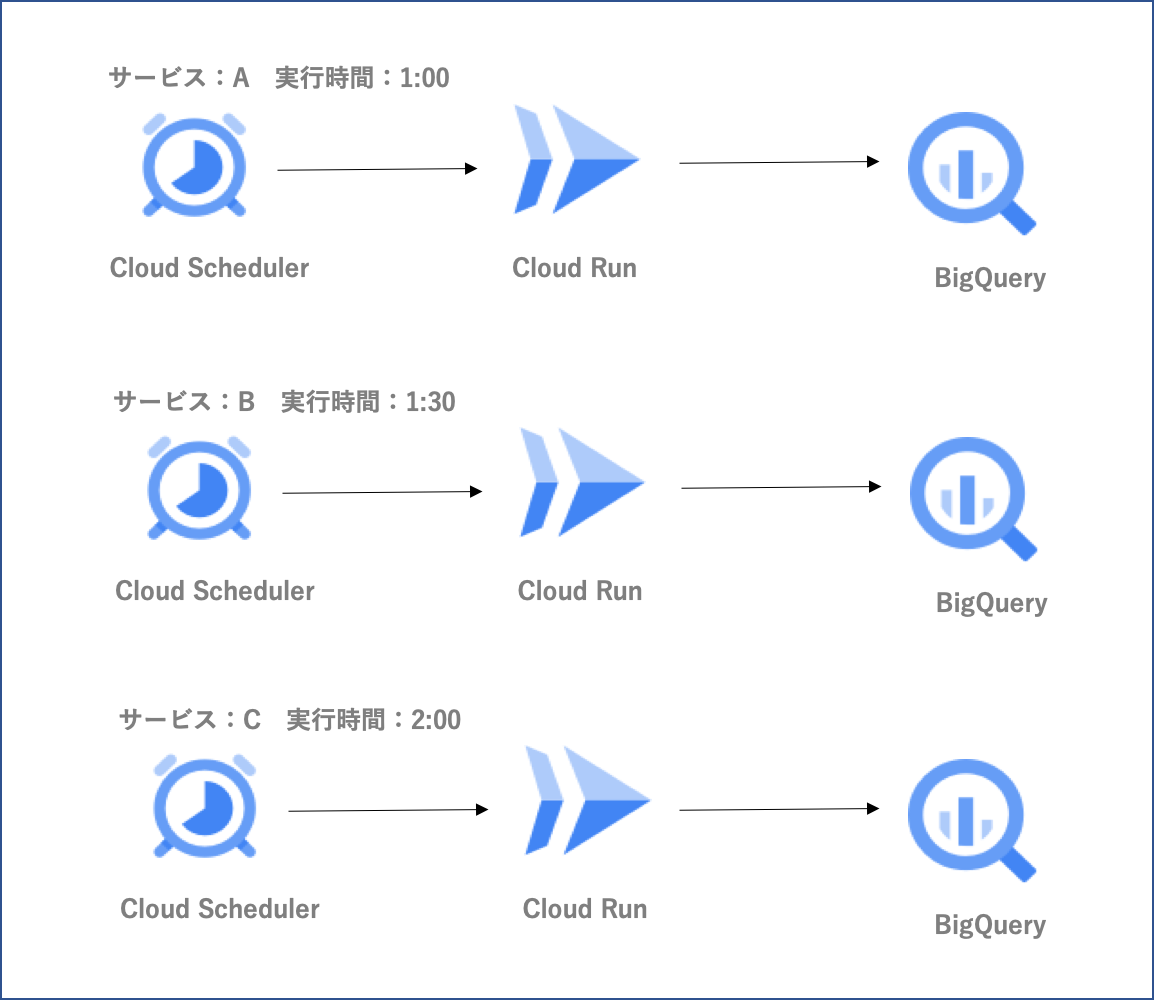
サービスは全部で3つあり指定時間になると外部データをBiqQueryに保存します。
(前処理を待つわけではありません)
やりたいこと
以下の2つです。
- 各サービスでエラーが発生したらSlackに通知(通常エラー)
- 処理時間が30分を超えたらSlackに通知(処理時間超過エラー)
またチーム内で話あった際に「通知が深夜に来るよりも出勤時間付近に来たほうがよいのでは?」と言う意見も出たので、考慮しながらシステムを考えることにしました。
とりあえずGUIで作成してみる
まずは構成図を考えてみます。
サービス構成図
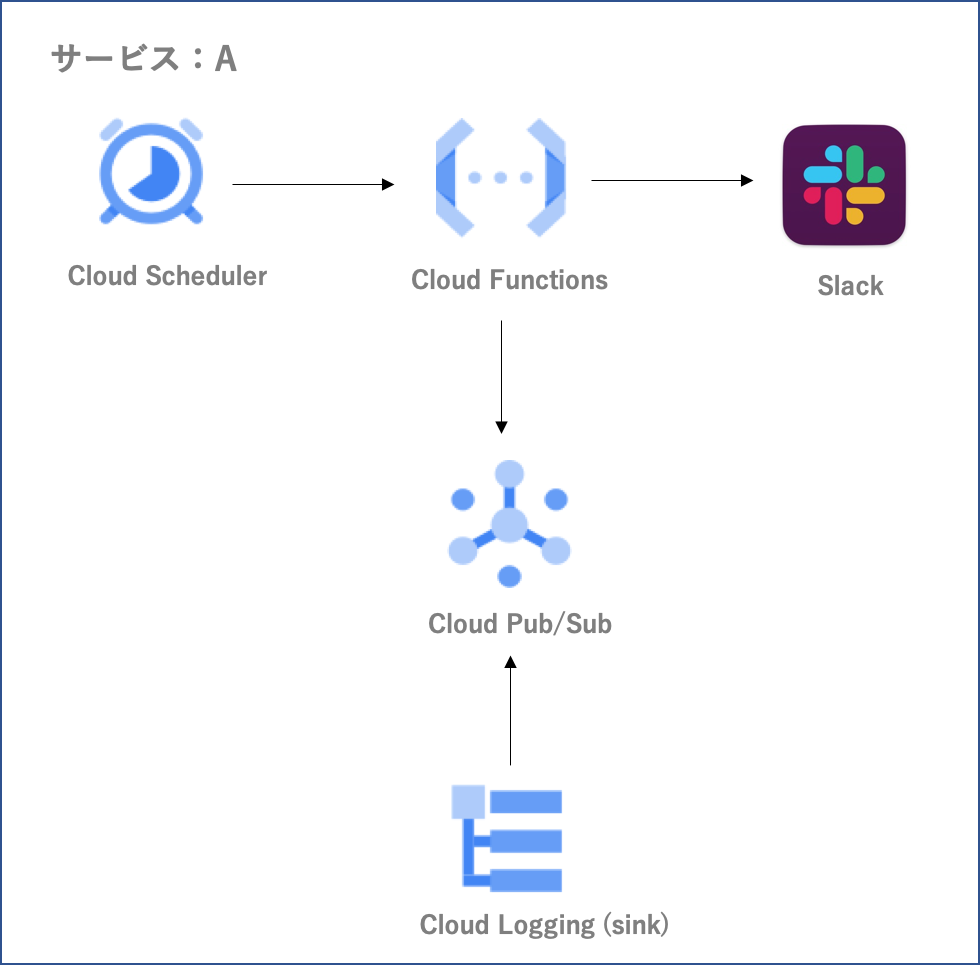
Cloud SchedulerでCloud Functionsを動かし、Cloud FunctionsからCloud Pub/Subを呼びだしSlackに通知します。
Cloud Pub/Subにメッセージを送るためにsinkの宛先をCloud Pub/Subにして、フィルター設定で特定のログを取得できるようにします。
また各サービスに独自処理が必要になるかもと思ったので、とりあえず1サービスに1台のCloud Functionsを作成することにしました。
Cloud Functions作成
以下で作成します。
- トリガータイプ:HTTP
- ランタイム:Node.js 14
- エントリポイント:sendSlack
とりあえず作成するだけなので、コードはデフォルトのまま(「hello」と表示される)です。
Cloud Scheduler作成
以下で作成します。
- ターゲットタイプ:HTTP
- 頻度:0 10 * * *
- URL:Cloud Functionsで作成したものを使用
Cloud Pub/Sub作成
通常エラー用と処理時間超過エラー用の2種類作成します。
通常エラー用
- トピックID:pubsub-A-error
処理時間超過エラー用
- トピックID:pubsub-A-time-out-error
subscriptionは自動で作成するようにしました。
sink作成
sinkも通常エラー用と処理時間超過エラー用の2種類作成します。
通常エラー用
- sink名:sink-A-error
フィルタ設定
resource.type=("cloud_scheduler_job" OR "cloud_run_revision")
resource.labels.service_name=~"A-cloudrun" OR resource.labels.job_id=~"A-cron"
NOT textPayload=~"It is very likely that you can safely ignore this message and that this is not the cause of any error you might be troubleshooting."
"error"
処理時間超過エラー用
- sink名:sink-A-time-out-error
フィルタ設定
resource.labels.service_name=~"A-cloudrun"
NOT textPayload=~"It is very likely that you can safely ignore this message and that this is not the cause of any error you might be troubleshooting."
httpRequest.status=204
このメッセージログは不要なので取得できないようにします。
It is very likely that you can safely ignore this message and that this is not the cause of any error you might be troubleshooting.
これで一旦必要なものは作成完了です。
ローカル環境でCloud Functions開発を行う
開発方法を選択
ローカル環境で開発する際に以下のどちらかを選択します。
- Function Frameworks
- Cloud Native Buildpacks
アーキテクチャの概念
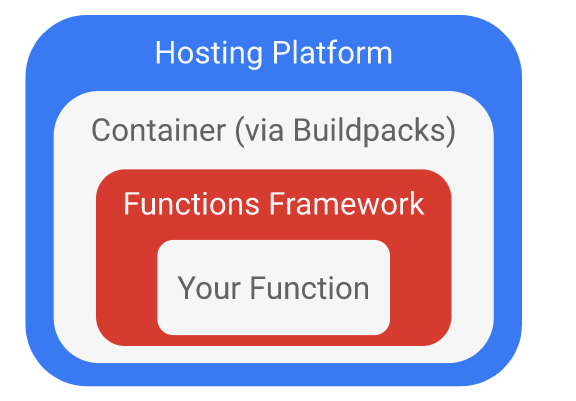
Function Frameworksは、Cloud functionsを実行できる環境です。
Cloud Native Buildpacksは、コンテナ(docker)を用いてCloud functionsを実行できる環境です。
コンテナのほうが開発者同士同じ環境で開発できるので、Cloud Native Buildpacksで開発を行うことにしました。
必要なライブラリをインストール
Cloud Native Buildpacksをインストールします。
$ brew install buildpacks/tap/pack
bashに保存します。
$ echo '. $(pack completion)' >> ~/.bash_profile
pub/sub処理用ライブラリをインストールします。
$ npm install @google-cloud/pubsub
Slack処理用ライブラリをインストールします。
$ npm install @slack/webhook
日付処理用ライブラリをインストールします。
$ npm install dayjs
コードを書く
とりあえずサービスAを対象にコードを書きました。
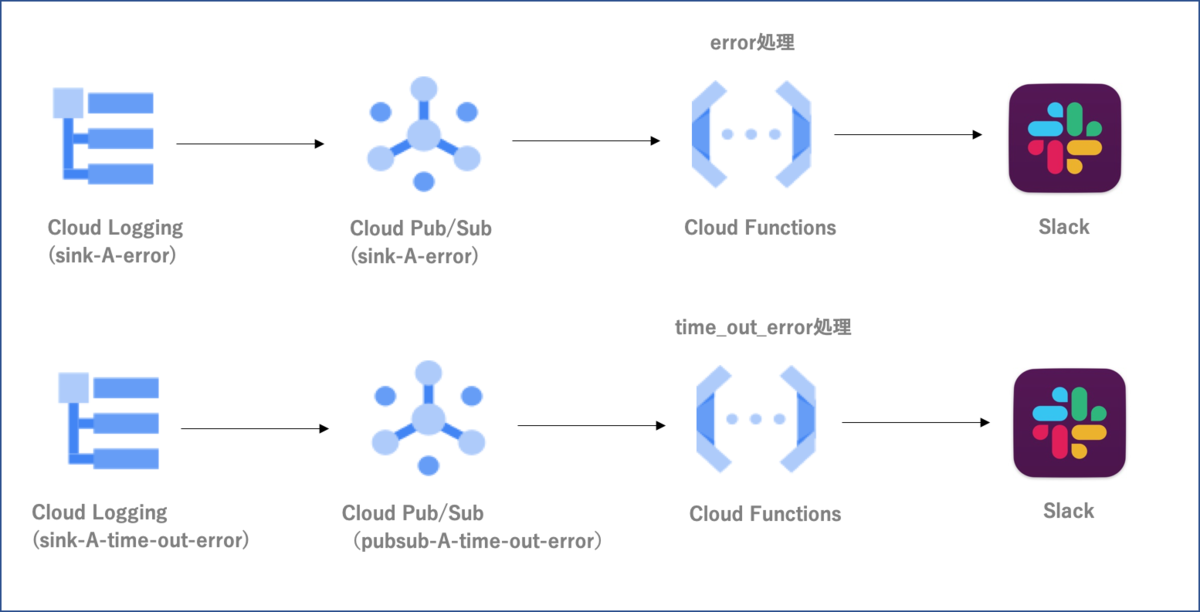
1台のCloud Functionsに処理エラーと処理時間超過エラーの処理を書くようにしました。
pub/sub処理は、同期pub/subと非同期pub/subの2種類ありますが、今回は同期pub/subで書くことにします。
具体的な構成図

index.js
'use strict';

exports.sendSlack = (req, res) => {
  error('pubsub-A-error-sub').catch(console.error);
  timeOverError('pubsub-A-time-out-error-sub').catch(console.error);

  res.status(200)
  res.end();
}

const PROJECT_ID = 'project_id';

async function error(subscriptionName) {
  const {v1} = require('@google-cloud/pubsub');
  const subClient = new v1.SubscriberClient();
  const subPath = subClient.subscriptionPath(PROJECT_ID, subscriptionName);

  const [response] = await subClient.pull({
    subscription: subPath,
    maxMessages: 100,
  });

  const ackIds = [];
  for (const message of response.receivedMessages) {
    const response = JSON.parse(message.message.data);

    sendSlack(errorMessage(response));
  }
    ackIds.push(message.ackId);
  }

  if (ackIds.length !== 0) {
    const ackRequest = {
      subscription: subPath,
      ackIds: ackIds,
    };

    await subClient.acknowledge(ackRequest);
  }
}

async function timeOverError(subscriptionName) {
  const {v1} = require('@google-cloud/pubsub');
  const subClient = new v1.SubscriberClient();
  const subPath = subClient.subscriptionPath(PROJECT_ID, subscriptionName);

  const [response] = await subClient.pull({
    subscription: subPath,
    maxMessages: 100,
  });

  const ackIds = [];
  for (const message of response.receivedMessages) {
    const response = JSON.parse(message.message.data);
    const executeTime = new Date(response.timestamp);

    const now = new Date();
    // NOTE: 各システムによって引数の数値が変わる
    const TimeLimit = new Date(now.getFullYear(), now.getMonth(), now.getDate(), 1, 30, 0);

    if (executeTime > TimeLimit) {
      sendSlack(timeOverErrorMessage(response));
    }

    ackIds.push(message.ackId);
  }

  if (ackIds.length !== 0) {
    const ackRequest = {
      subscription: subPath,
      ackIds: ackIds,
    };

    await subClient.acknowledge(ackRequest);
  }
}

function sendSlack(message) {
  const {IncomingWebhook} = require('@slack/webhook');
  const webhook = new IncomingWebhook(process.env['SLACK_WEBHOOK']);

  webhook.send(message);
}

function errorMessage(response) {
  const slackMessage = require('../lib/slack_message.js');
  const serviceName = response.resource.labels.service_name || response.resource.labels.job_id;
  const message = slackMessage.base();
  const body = JSON.stringify(response, null, 4);

  slackMessage.setTitle(message, ":small_red_triangle_down: *処理エラー*");
  slackMessage.setContent(message, `リソースタイプ: ${response.resource.type} \n サービス名: ${serviceName} \n 終了時間:${receiveTimestamp}`);
  slackMessage.setBody(message, body);

  return message;
}

function timeOverErrorMessage(response) {
  const slackMessage = require('../lib/slack_message.js');
  const serviceName = response.resource.labels.service_name || response.resource.labels.job_id;
  const dayjs = require('dayjs');
  const message = slackMessage.base();
  const receiveTimestamp = receiveTimestamp = dayjs(new Date(response.receiveTimestamp)).format('YYYY-MM-DD HH:mm:ss');
  const body = JSON.stringify(response, null, 4);

  slackMessage.setTitle(message, ":small_red_triangle_down: *処理時間超過エラー*");
  slackMessage.setContent(message, `リソースタイプ: ${response.resource.type} \n サービス名: ${serviceName} \n 終了時間:${receiveTimestamp}`);
  slackMessage.setBody(message, body);

  return message;
}
他サービスでも使えるように、Slackメッセージ作成関数を別ファイルにしてみました。
lib/slack_message.js
'use strict';

exports.setTitle = (message, text) => {
  message['blocks'][0]['text']['text'] = text;
}

exports.setContent = (message, text) => {
  message['blocks'][1]['text']['text'] = text;
}

exports.setBody = (message, text) => {
  message['attachments'][0]['blocks'][0]['text']['text'] = text;
}

exports.base = ()  => {
  return {
    username: "notif",
    blocks: [
      {
        type: "section",
        text: {
          type: "mrkdwn",
          text: ""
        }
      },
      {
        type: "section",
        text: {
          type: "mrkdwn",
          text: ""
        }
      }
    ],
    attachments: [{
      color: "#f54242",
      blocks: [{
        type: "section",
        text: {
          type: "mrkdwn",
          text: ""
        }
      }]
    }]
  }
}
Slackに流すメッセージは「block-kit-builder」というブラウザだけで簡単にプロトタイピングすることができるツールで作成しました。
コンテナをビルド
a_serviceというイメージを作成します。
$ pack build --env-file ./buildpacks_envfile --builder gcr.io/buildpacks/builder:v1 a_service
gcr.io/buildpacks/builder:v1はgoogleが公開しているイメージです。
Google: gcr.io/buildpacks/builder:v1 Ubuntu 18 base image with buildpacks for .NET, Go, Java, Node.js, and Python
環境変数は別ファイル設定しています。
buildpacks_envfile
GOOGLE_RUNTIME=nodejs
GOOGLE_FUNCTION_SIGNATURE_TYPE=html
GOOGLE_FUNCTION_TARGET=sendSlack
docker起動
$ docker run --rm -p 8080:8080 -e GOOGLE_APPLICATION_CREDENTIALS=/tmp/keys/secrets.json \
-v $GOOGLE_APPLICATION_CREDENTIALS:/tmp/keys/secrets.json:ro s_service
docker起動時に「GOOGLE_APPLICATION_CREDENTIALS」を渡してあげないと、以下のエラーになるので注意が必要です。
Error: Unable to detect a Project Id in the current environment.
To learn more about authentication and Google APIs, visit:
https://cloud.google.com/docs/authentication/getting-started
ローカル環境のテスト
前準備としてサービスAのCloud Runでエラーを発生させておきます。
(エラーログを50件ほど貯めました)
あとはCloud Schedulerを実行するだけでテストできます。
テスト実施!
しかし、50件中20件ほどしかSlackに通知されませんでした。
GoogleApiのreferrenceを見てみると
Required. The maximum number of messages to return for this request. Must be a positive integer. The Pub/Sub system may return fewer than the number specified.
対策が必要そうだと判明しました。
開発を経て気になること
気になること
- コードを書いてみるとサービス毎の違いはあまり無い
- Cloud FunctionsにPub/Sub処理を書くとコード量が増える
- Slack通知を指定時間にしなくてもいいのでは?
- コンテナ化するメリットがあまり無いように感じる
- コード修正するたびにビルドするのが面倒。Function Frameworksはビルドがないので楽
同期Pub/Sub処理を修正しないといけないので、ついでに気になることも全て対応することにしました。
構成を再検討する
以下のようにします。
- サービス毎にCloud Functionsを分けない
- Slack通知の時間指定はやめる
- Cloud FunctionsのトリガーをCloud SchedulerではなくCloud Pub/Subにする
- 処理エラー(error)と処理時間超過エラー(time_out_error)は各々Cloud Functionsを作成する
- ローカル開発はFunction Frameworksを使用する
再検討構成図
Function Frameworksでローカル環境を動かす
Function Frameworksをインストールします。
$ npm install @google-cloud/functions-framework
起動方法
Slackwebhook用の環境変数はnpx起動時に渡すことにしました。
$ SLACK_WEBHOOK=https://hooks.slack.com/services/○○○○ npx functions-framework --target=sendSlack --signature-type=event
コードを書き直す
通常エラー用
'use strict';

exports.sendNotificationSlack = (event, context) => {
  const decode      = Buffer.from(event.data, 'base64').toString();
  const response    = JSON.parse(decode);

  sendSlack(formatMessage(response));
}

function sendSlack(message) {
  const {IncomingWebhook} = require('@slack/webhook');
  const webhook           = new IncomingWebhook(process.env['SLACK_WEBHOOK']);

  webhook.send(message);
}

function formatMessage(response) {
  const slackMessage = require('../lib/slack_message.js');

  const serviceName      = response.resource.labels.service_name || response.resource.labels.job_id;
  const message          = slackMessage.base();
  const body             = JSON.stringify(response, null, 4);

  slackMessage.setTitle(message, ":small_red_triangle_down: *処理エラー*");
  slackMessage.setContent(message, `リソースタイプ: ${response.resource.type} \n サービス名: ${serviceName}`);
  slackMessage.setBody(message, body);

  return message;
}
処理時間超過エラー用
'use strict';

exports.sendNotificationSlack = (event, context) => {
  const decode      = Buffer.from(event.data, 'base64').toString();
  const response    = JSON.parse(decode);
  const receiveTime = new Date(response.receiveTimestamp);
  const now         = new Date();
  const TimeLimit   = new Date(now.getFullYear(), now.getMonth(), now.getDate(), 1, 30, 0);

  if (receiveTime > TimeLimit) {
    sendSlack(formatMessage(response));
  }
}

function sendSlack(message) {
  const {IncomingWebhook} = require('@slack/webhook');
  const webhook           = new IncomingWebhook(process.env['SLACK_WEBHOOK']);

  webhook.send(message);
}

function formatMessage(response) {
  const slackMessage = require('../lib/slack_message.js');
  const dayjs        = require('dayjs');

  const serviceName      = response.resource.labels.service_name || response.resource.labels.job_id;
  const message          = slackMessage.base();
  const receiveTimestamp = dayjs(new Date(response.receiveTimestamp)).format('YYYY-MM-DD HH:mm:ss');
  const body             = JSON.stringify(response, null, 4);

  slackMessage.setTitle(message, ":small_red_triangle_down: *処理時間超過エラー*");
  slackMessage.setContent(message, `リソースタイプ: ${response.resource.type} \n サービス名: ${serviceName} \n 終了時間:${receiveTimestamp}`);
  slackMessage.setBody(message, body);

  return message;
}
かなりシンプルになりました。
ローカル環境のテスト
Cloud FunctionsのトリガーをPub/Subに変更したので、テスト方法が変わりcurlコマンドで行います。
POSTで送るデータはCloud Pub/Sub実行時に送られるデータと同じ形にしました。
$ curl localhost:8080 -X POST -H "Content-Type: application/json" -d @test/error.json
test/error.json
{
  "data":
  {
    "data": "base64でエンコードした文字列"
  }
}
テスト実行したところ、無事Slack通知されました!
感想
書きたいことがありすぎてかなり長い記事になりました。
まだサービス毎に判断する修正やデプロイが残っているので引き続き開発しようと思います。
詰まった箇所/悩んだ箇所はある程度書けたので何かの役に立てればと思います。