こんにちは、Agency事業でクライアントの受発注システムを担当しているリードアプリケーションエンジニアの花田です。
前回のブログ執筆中ずっとベビーベットで寝ていた娘が、今では一人で歩き回るようになり毎日奇声を上げるようになりました。かわいい。
今回はBigQueryのレポートデータをExcel出力するまでの出来事を書いていこうと思います。
背景
私が担当しているレポート表示サービスにExcel出力機能が欲しいと要望が来たので開発することになりました。
現状のレポート(Tableauで作成)と同等のものをExcelで表現する必要があり、いくつか工夫しながら作業を行いました。
Excel出力の全体像
さっそくですが、全体像が分かると理解しやすいと思うのでExcel出力関係のシステム構成図を載せて置きます。
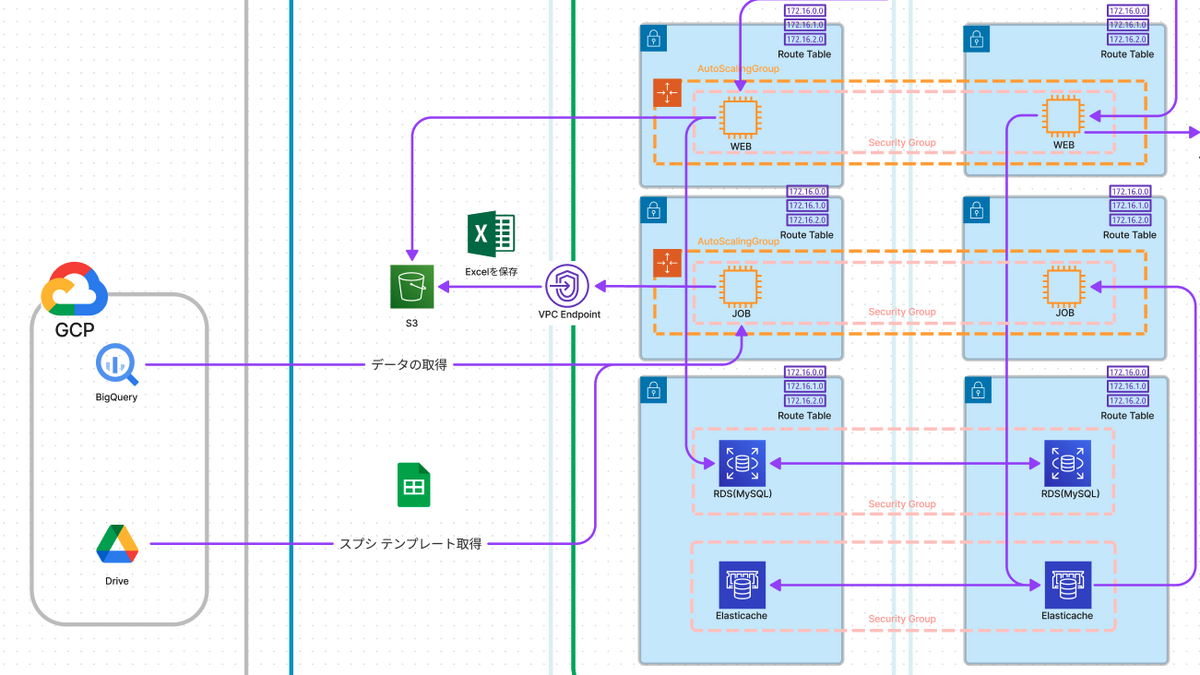
※システム全体の構成図だと見づらいのでデプロイやログ通知周り等は削除しています。
サーバーはWEB、JOB共に2台構成となっています。

こちらは出力されたExcelファイルのイメージ図で、一部項目や値を変更しています。
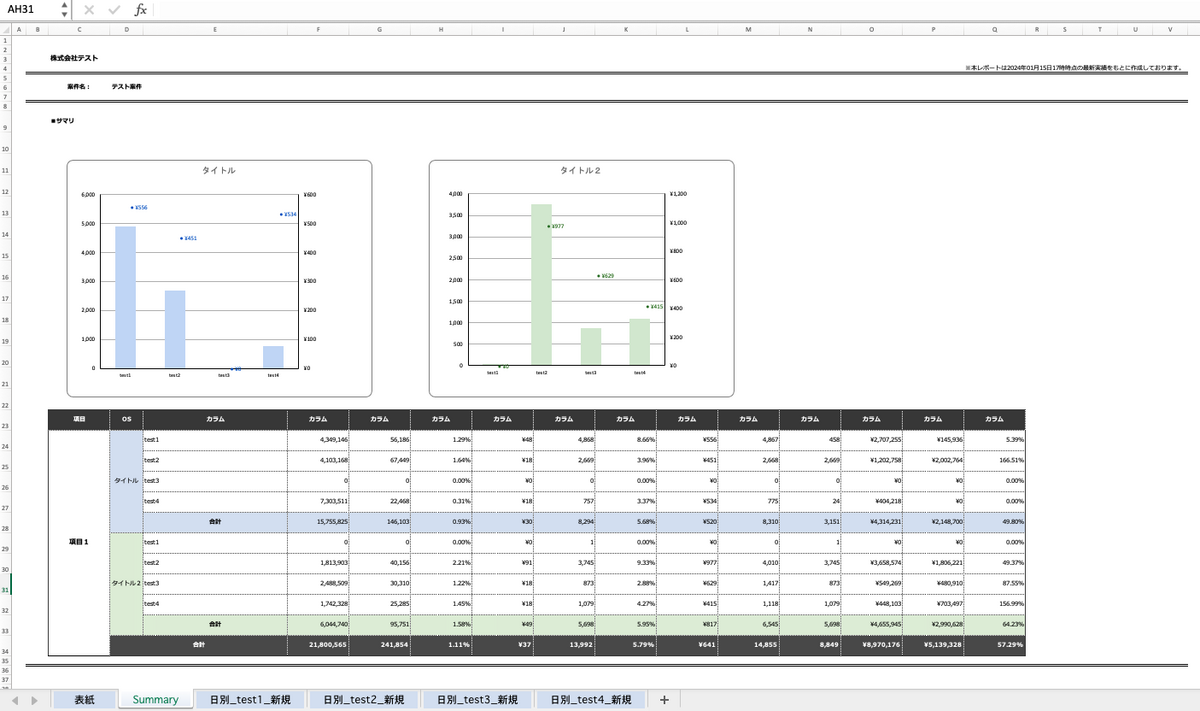
Excel出力の主な要件は以下の通りです。
- BigQueryのレポートデータを利用する
- 「サマリー」「日別」「月別」のシートを用意する
- レポートデータの条件によって、計算処理 / シートの増減 / グラフの増減 を行う
- レポート期間は月単位で選択でき、過去6ヶ月分選べるようにする
開発初期の話
開発初期段階はシステム構成や言語が決まっていなかったので調査/検証を行いました。
システム構成 編
こちらはExcel出力機能の処理場所を決定するためにまとめた表です。
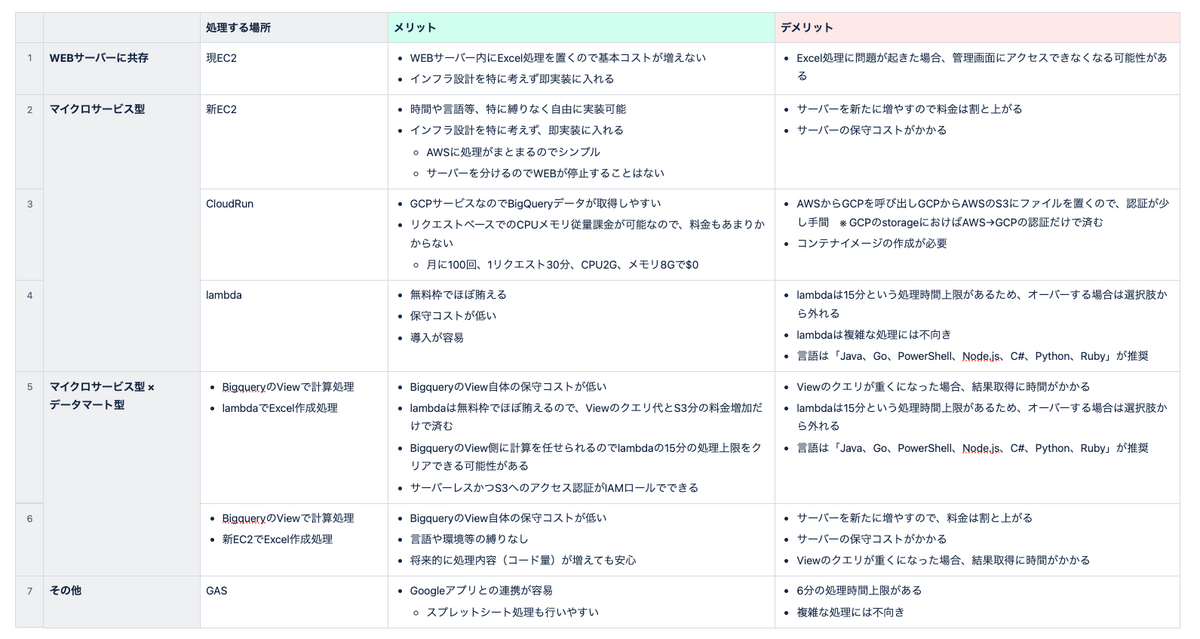
他にもAWS FargateやGCP Cloud Function、App Engine等も調査しましたが、最終的にはWEBサーバーと揃えることにしたためAWSのEC2で実現しました。
言語選定 編
Excel出力機能をスプレッドシート経由で行う前にライブラリで実現できないか調査/検証を行っていました。
- Ruby : 「roo」 「spreadsheet」 「rubyXL」 「caxlsx」
- Python : 「openpyxl」
上記のライブラリの検証を行い分かったことは、Excelにデータ追加/削除はできるのですが、シートのコピーやグラフ移動が難しく、最終的にはスプレッドシート経由で実装することになりました。
スプレッドシート経由に実装することでライブラリに依存しない決定ができるため、チーム内で一番運用コストが低いRubyに決定しました。
Excel出力処理が完成するまでの話
最初にExcel出力のシステムの流れと雛形スプレッドシートについて紹介します。
残りは具体的なコードを記載しつつ、GoogleAPIの実装をメインに紹介したいと思います。
Excel出力処理 編
まず初めにExcel出力されるまでの流れを簡単に紹介します。
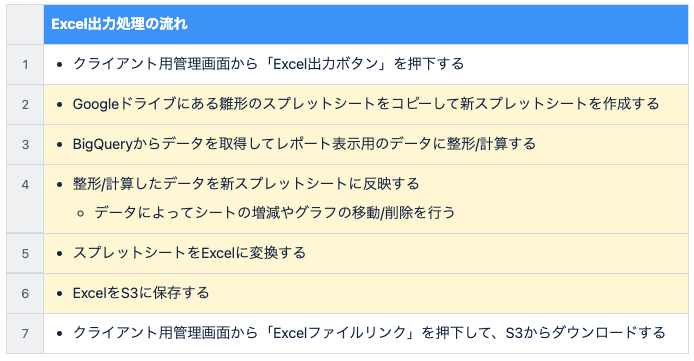
※ 黄色い背景はJOBサーバーの処理です。
雛形スプレッドシートの処理 編
次に雛形スプレッドシートの仕組みについて紹介します。
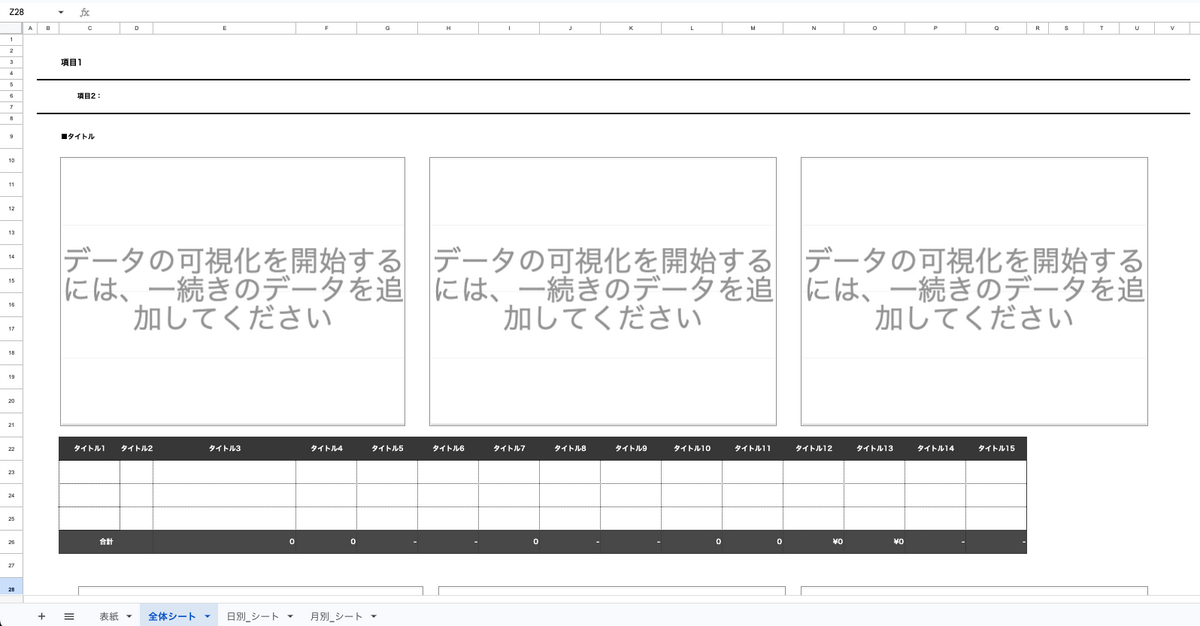
雛形スプレッドシートには値が入っていないテーブルとグラフを用意します。
グラフは予め必要な設定をしておき、テーブルにデータが追加されると表示できるようにしておきます。
例えばテーブル内にデータを追加するとき「23行目にデータ追加」のような処理を書くのではなく、タイトル1の下にデータを追加のように特定のキーワードから対象のデータを追加しています。
こうすることで雛形スプレッドシートに変更が加わり行数が変更されたとしても対応できるようになります。
またグラフ操作する場合は全てのパターンのグラフを用意しておき、データによって削除しています。
ただし削除だけ行うとグラフ位置がおかしくなるので、違和感のない位置にグラフを移動するようにもしています。
別の方法としてデータからグラフを生成する方法もあるのですが、コードにグラフ生成の複雑な処理が必要なので、今回は削除/移動を駆使することで対応しました。
GoogleAPIの認証 編
実際に開発がスタートして最初に躓いたポイントはGoogleAPIの認証部分でした。
GoogleAPIで実現したいことは大きく分けて2つあります。
- スプレッドシートのコピー/削除の処理
- スプレッドシート内のデータ追加/削除やグラフ移動などの処理
この2つを実現するためには、Rubyのgemであるgoogle-apis-drive_v3とgoogle-apis-sheets_v4が必要です。
これらのgemを利用するにはGoogleAPIの認証が必要なので設定しました。
スプレッドシートのコピー/削除の処理
スプレッドシートのコピー/削除にはgoogle-apis-drive_v3を利用します。
このgemはGoogleドライブ内のファイル操作等が行なえます。
しかし弊社が管理しているGoogleドライブにアクセスするためにはメールアドレスが特定のドメインでないとアクセスできないため、GoogleアカウントでOAuth2.0の認証を行う必要がありました。
やり方はGoogle Cloud Consoleの「APIとサービス」 → 「認証情報」からOAuthの設定が行えます。
その際ブラウザで認証するため、以下のURLを作る必要があります。
https://accounts.google.com/o/oauth2/auth
?client_id=[OAuth設定で取得したクライアントID]
&redirect_uri=[Auth設定で取得した設定したリダイレクトURI]
&scope=https://www.googleapis.com/auth/drive (使用したいサービスのAPIにスコープする。今回はGoogleドライブ)
&response_type=code (認証をコードとして出力)
&approval_prompt=force (認証をスキップしない)
&access_type=offline (リフレッシュキーを発行)
※詳しいOAuth2.0の認証方法は他のブログでも多く記載されているので、ここでは省きます。
スプレッドシート内のデータ追加/削除やグラフ移動などの処理
スプレッドシート内の操作を行うため、google-apis-sheets_v4を利用しました。
このgemはスプレッドシート内のデータ追加やグラフ移動が行えたり、特定の範囲からデータを取得することもできます。
Googleドライブ内のスプレッドシートを利用したいので、こちらもOAuth2.0を利用しました。
スプレッドシート関連のRubyコード
google-apis-drive_v3とgoogle-apis-sheets_v4を利用したコードを一部変更/抜粋した形で紹介します。
以下は上記gemの拡張性を高めるためにラップしたコードになります。
OAuth2.0認証の実装
gemのgoogleauthを利用して、OAuth2.0の認証設定を定義しています。
# lib/gcp_client.rb

require "googleauth"

class GcpClient
  def initialize
    credentials = Google::Auth::UserRefreshCredentials.new(
      client_id:     Settings.gcp.api.client_id,
      client_secret: Settings.gcp.api.client_secret,
      scope:         %w(https://www.googleapis.com/auth/drive https://spreadsheets.google.com/feeds/),
      redirect_uri:  'http://localhost'
    )

    credentials.refresh_token = Settings.gcp.api.refresh_token
    credentials.fetch_access_token!

    @gcp_client = credentials
  end
end
GoogleドライブAPIの実装
ここではgoogle/apis/drive_v3を呼んでおり、スプレッドシートのコピーとExcel変換後の不要なスプレッドシートの削除処理も行っています。
# lib/gcp_client/drive_service.rb

require 'google/apis/drive_v3'

class GcpClient
  class DriveService < GcpClient
    def initialize
      super

      @service = Google::Apis::DriveV3::DriveService.new
      @service.authorization = @gcp_client
    end

    def copy_spreadsheet(spreadsheet_id, file_name)
      # supports_team_drives: true は共有ディレクトリを指定する場合に必要
      copied_file = @service.copy_file(spreadsheet_id, Google::Apis::DriveV3::File.new(name: file_name), supports_team_drives: true)

      copied_file.id
    end

    def delete_spreadsheet(spreadsheet_id)
      @service.update_file(
        spreadsheet_id,
        { trashed: true },
        supports_team_drives: true
      )
    end
  end
end
スプレッドシートAPIの実装
ここではスプレッドシート内の処理を記載しており、シートのコピーや削除、データ追加などは比較的簡単に実装できます。
しかしグラフ移動に関してはセルの位置やグラフの範囲を指定する必要があるので、少し複雑になっています。
# lib/gcp_client/sheet_service.rb

require 'google/apis/sheets_v4'

class GcpClient
  class SheetService < GcpClient
    def initialize
      super

      @service = Google::Apis::SheetsV4::SheetsService.new
      @service.authorization = @gcp_client
    end

    def copy_sheet(spreadsheet_id, sheet_id, new_sheet_name, sheet_index)
      requests = [
        Google::Apis::SheetsV4::Request.new(
          duplicate_sheet: Google::Apis::SheetsV4::DuplicateSheetRequest.new(
            source_sheet_id:    sheet_id,
            insert_sheet_index: sheet_index,
            new_sheet_name:     new_sheet_name
          )
        )
      ]
      batch_update_spreadsheet_request = Google::Apis::SheetsV4::BatchUpdateSpreadsheetRequest.new(requests: requests)
      @service.batch_update_spreadsheet(spreadsheet_id, batch_update_spreadsheet_request)
    end

    def delete_sheet(spreadsheet_id, sheet_id)
      requests = [
        Google::Apis::SheetsV4::Request.new(
          delete_sheet: Google::Apis::SheetsV4::DeleteSheetRequest.new(
            sheet_id: sheet_id
          )
        )
      ]

      batch_update_spreadsheet_request = Google::Apis::SheetsV4::BatchUpdateSpreadsheetRequest.new(requests: requests)
      @service.batch_update_spreadsheet(spreadsheet_id, batch_update_spreadsheet_request)
    end

    def update_rows(spreadsheet_id, sheet_name, cell_name, row)
      range       = "#{sheet_name}!#{cell_name}"
      value_range = Google::Apis::SheetsV4::ValueRange.new(values: row)

      # NOTE: USER_ENTEREDは、入力がスプレッドシートの UI に入力された場合と同じように解析される。sumの計算などが可能
      @service.update_spreadsheet_value(spreadsheet_id, range, value_range, value_input_option: 'USER_ENTERED')
    end

    def get_spreadsheet_values(spreadsheet_id, range)
      @service.get_spreadsheet_values(spreadsheet_id, range)
    end

    ・
    ・
    ・
    ・
    ・


    def move_chart(spreadsheet_id, sheet_id, chart_id, row_index, column_index)
      request = Google::Apis::SheetsV4::UpdateEmbeddedObjectPositionRequest.new(
        object_id_prop: chart_id,
        fields:         '*',
        new_position:   Google::Apis::SheetsV4::EmbeddedObjectPosition.new(
          overlay_position: Google::Apis::SheetsV4::OverlayPosition.new(
            anchor_cell:     Google::Apis::SheetsV4::GridCoordinate.new(
              sheet_id:     sheet_id,
              row_index:    row_index,   # グラフを貼り付けるセルの行番号を指定
              column_index: column_index # グラフを貼り付けるセルの列番号を指定
            ),
            height_pixels:   500,  # グラフの高さを指定
            width_pixels:    600,  # グラフの幅を指定
            offset_x_pixels: 40,   # グラフのX座標を指定
            offset_y_pixels: 10    # グラフのY座標を指定
          )
        )
      )

      batch_update_request = Google::Apis::SheetsV4::BatchUpdateSpreadsheetRequest.new(
        requests: [Google::Apis::SheetsV4::Request.new(update_embedded_object_position: request)]
      )
      @service.batch_update_spreadsheet(spreadsheet_id, batch_update_request)
    end
  end
end
GoogleAPIの実行 編
BigQueryからデータを取得したあと、雛形スプレッドシートからコピーした新スプレッドシートに対して、データ追加、グラフの移動/削除等を行います。
それらを実行するコードの一部分を変更/抜粋して紹介します。
スプレッドシートを操作する親クラスの実装
ここでは「スプレッドシート関連のRubyコード」のコードを呼び出している親クラスを定義しています。
子クラスには、日別シート処理、月別シート処理などシート毎に処理を実装しているので、親クラスでは共通して必要なメソッドのみ実装しています。
class SpreadsheetProcessor
  def initialize(unique_key)
    @unique_key             = unique_key
    @spreadsheet_id         = create_new_spreadsheet_from_template
    @report_outpt_time_text = report_output_time_text
  end

  def delete_spreadsheet
    drive_service.delete_spreadsheet(@spreadsheet_id)
  end

  private

  def create_new_spreadsheet_from_template
    @spreadsheet_id = drive_service.copy_spreadsheet(Settings.gcp.tmp_spreadsheet_id, @unique_key)
  end

  def spreadsheet_service
    @spreadsheet_service ||= GcpClient::SheetService.new
  end

  def drive_service
    @drive_service ||= GcpClient::DriveService.new
  end

  def report_output_time_text
    create_time_text = Time.current.strftime('%Y年%m月%d日%H')

    Settings.excel_sheet.report_output_time_text.gsub(/【yyyymmddhh】/, create_time_text)
  end
end
日別シート処理の実装
ここでは日別のシートを作成処理を実装しており、主にシートのコピー、グラフの移動/削除、テーブルの更新を行っています。
google-apis-sheets_v4でデータ更新する際はセルを指定する必要があるのですが、汎用性が悪いので極力セル指定をさけるような実装を行っています。
class SpreadsheetProcessor
  class DailySheet < SpreadsheetProcessor
    def initialize(spreadsheet_id, report_output_time_text)
      @spreadsheet_id          = spreadsheet_id
      @original_sheet_id       = serach_sheet_id("#{Settings.gcp.spreadsheet.date_type.dayly}_original")
      @report_output_time_text = report_output_time_text
    end

    def renew(bq_daily)
      bq_daily.reverse_each do |daily|
        daily.each_with_index do |row, index|
          sheet_name = generate_short_sheet_name(Settings.gcp.spreadsheet.date_type.dayly, row[:title_1], row[:title_2])

          copy_sheet(sheet_name, index)
          update_header(row, sheet_name)
          delete_chart(row, sheet_name)
          modify_table(row, sheet_name)
        end
      end
      spreadsheet_service.delete_sheet(@spreadsheet_id, @original_sheet_id)
    end

    private

    def copy_sheet(sheet_name, index)
      start_index = 3
      spreadsheet_service.copy_sheet(@spreadsheet_id, @original_sheet_id, sheet_name, start_index + index)
    end

    def update_header(row, sheet_name)
      name_cell  = 'C2'
      title_cell = 'D6'
      type_cell  = 'I6'

      # NOTE: update_rowsの第4引数の更新値は二次元配列にする必要がある
      spreadsheet_service.update_rows(@spreadsheet_id, sheet_name, name_cell, [[row[:name]]])
      spreadsheet_service.update_rows(@spreadsheet_id, sheet_name, title_cell, [[row[:title]]])
      spreadsheet_service.update_rows(@spreadsheet_id, sheet_name, type_cell, [[row[:type]]])
    end

    def modify_table(row, sheet_name)
      update_or_delete_table_rows(row[:title_1], sheet_name, Settings.gcp.spreadsheet.title1)
      update_or_delete_table_rows(row[:title_2], sheet_name, Settings.gcp.spreadsheet.title2)
      update_or_delete_table_rows(row[:title_3], sheet_name, Settings.gcp.spreadsheet.title3)
    end

    def update_or_delete_table_rows(row, sheet_name, title)
      daily_start_index = serach_start_index_of_daily(sheet_name, title)
      sheet_id          = serach_sheet_id(sheet_name)

      if row.first.present?
        cell_name = 'C' + (daily_start_index + 1).to_s

        spreadsheet_service.update_rows(@spreadsheet_id, sheet_name, cell_name, row)

        delete_blank_row_in_daily(sheet_id, sheet_name, title)
      else
        total_amount_start_index = serach_start_index_of_total_amount(sheet_name, title)

        delete_daily_table(sheet_id, daily_start_index)
        delete_total_amount_row(sheet_id, total_amount_start_index)
      end
    end

     ・
     ・
     ・
     ・
     ・
     ・

    def delete_daily_table(sheet_id, daily_start_index)
      blank_line_count = 12
      delete_row_count = 44
      start_index   = daily_start_index - blank_line_count

      spreadsheet_service.delete_rows(@spreadsheet_id, sheet_id, start_index, delete_row_count)
    end

    def delete_total_amount_row(sheet_id, total_amount_start_index)
      delete_row_count = 1

      spreadsheet_service.delete_rows(@spreadsheet_id, sheet_id, total_amount_start_index, delete_row_count)
    end

    def serach_sheet_id(sheet_name)
      spreadsheet_service.get_sheet_id(@spreadsheet_id, sheet_name)
    end

    def serach_start_index_of_total_amount(sheet_name, name)
      spreadsheet = spreadsheet_service.get_spreadsheet_values(@spreadsheet_id, "#{sheet_name}!C1:C1000")

      spreadsheet.values.index { |row| row.include?(name) }
    end
  end
end
スプレッドシートからExcelに変換
Excel変換する処理
スプレッドシートをExcel変換する処理はシンプルで、https://docs.google.com/spreadsheets/d/#{@spreadsheet_id}/export?format=xlsxを実行することで変換されます。
その後EC2インスタンス内の/tmp/配下にExcelを保持して、別の処理でS3にアップロードしています。
  def convert_spreadsheet_to_excel
    uri                      = URI("https://docs.google.com/spreadsheets/d/#{@spreadsheet_id}/export?format=xlsx")
    request                  = Net::HTTP::Get.new(uri)
    request['Authorization'] = spreadsheet_service.generate_bearer_authentication_header

    export_response = Net::HTTP.start(uri.host, uri.port, use_ssl: true) do |http|
      http.request(request)
    end

    if ['301', '307'].include?(export_response.code)
      # NOTE: リダイレクト先のURLを取得(スプシの一時ダウンロードリンクが取得できる)
      redirect_url = export_response.header['location']

      excel_response = Net::HTTP.get_response(URI.parse(redirect_url))
    else
      raise "Failed to export spreadsheet. response code: #{export_response.code}"
    end

    excel_file_path = "/tmp/#{@unique_key}.xlsx"
    open(excel_file_path, 'wb') do |file|
      file.write(excel_response.body)
    end

    { excel_file_path: excel_file_path, excel_file_size: excel_response.body.size }
  end
GoogleAPIの上限
Excel出力処理が完成してテストを実施するとGoogle::Apis::RateLimitError (userRateLimitExceeded: User rate limit exceeded.):のエラーに直面しました。
これはGoogleAPIの上限エラーで、1分間に60回以上APIを実行するとエラーになります。
対策としては、Google Cloud Consoleで上限変更の申請を出すことで解決できます。
申請を出してから次の日に、上限を60 → 300に変更されたことを知らせるメールが届いていたので、比較的早く対応してもらえると思います。
今後について
追加要望やリファクタリングなどまだやることが残っているのですが、その中でも先に考えておきたいのが雛形スプレッドシートの運用方法です。
staging、production環境用の雛形スプレッドシートを用意しているのですが、現状だとstagingの雛形スプレッドシートを更新した後、production環境の雛形スプレッドシートは手動で更新する必要があります。
なので今後は雛形スプレッドシートの自動デプロイできる仕組みを考えていきたいと思っています。
まとめ
今回はBigQueryのレポートデータをスプレッドシート経由でExcel出力する話を紹介しました。
Excel出力を自動化する記事が少なく情報精査するのにも時間がかかりましたが、無事完成させることができ良い経験となりました。
この記事が同じような悩みを抱えている方の助けになればと思います。