Adways Advent Calendar 7日目の記事です。
http://blog.engineer.adways.net/entry/advent_calendar/archive
はじめまして、デザイナーの黒田です。
みなさん、突然ですがSVGは使っていますか?
私は最近、サイトをリニューアルする機会があり、SVGスプライトを本格的に使ってみました。
今回はSVGスプライトを作成した流れと、グラデーションを使う際に工夫した点を書き留めておきたいと思います。
1, Illustratorで作成した画像をSVGで書き出し
Illustratorのアートボード1つにつき画像を1つ配置し、それぞれのアートボードに英数字で名前をつけました。
今回はこれらの画像をSVGスプライトにしたいと思います。
- normal (単色)
- gradation (グラデーション)
- gradation2 (グラデーション+グラデーションのライン)

まずは、アートボードごとにSVGを書き出します。

star_gradation2.svg をブラウザで開いてみましたが、ちゃんと表示されていますね!

エディタでも開いてみると、このようになっていました。
star_gradation2.svg
<svg xmlns="http://www.w3.org/2000/svg" xmlns:xlink="http://www.w3.org/1999/xlink" viewBox="0 0 100 100">
  <defs>
    <style>.a{fill:url(#a);}.b{fill:url(#b);}</style>
    <linearGradient id="a" x1="2.03" y1="49.56" x2="97.97" y2="49.56" gradientUnits="userSpaceOnUse"><stop offset="0" stop-color="#fff538"/><stop offset="0.2" stop-color="#fff538"/><stop offset="0.8" stop-color="#ff7800"/><stop offset="1" stop-color="#ff7800"/></linearGradient>
    <linearGradient id="b" x1="50" y1="87.8" x2="50" y2="13.08" gradientUnits="userSpaceOnUse"><stop offset="0.2" stop-color="#fff538"/><stop offset="0.8" stop-color="#ff7800"/></linearGradient>
  </defs>
  <title>star</title>
  <path class="a" d="M38.14,38.06L2,38.79,30.81,60.61,20.35,95.18,50,74.55,79.65,95.18,69.19,60.61,98,38.79l-36.11-.74L50,3.94ZM74.27,87.79L50,70.9,25.72,87.79l8.56-28.31L10.72,41.62,40.29,41,50,13.08,59.71,41l29.57,0.6L65.71,59.48Z"/>
  <path class="b" d="M74.27,87.8L50,70.9,25.72,87.8l8.56-28.31L10.72,41.62,40.29,41,50,13.08,59.71,41l29.57,0.6L65.71,59.49Z"/>
</svg>
2, 書き出したSVGを1つのファイルに結合
個々に書き出されたSVGデータを、1つのファイルに結合します。
こちらのジェネレーターで結合しました。
https://icomoon.io/app/#/select
DLする際、アートボードのサイズと、Preview Sizeを合わせておきましょう。
今回は、100px_100pxで作成したので、100と指定しました。
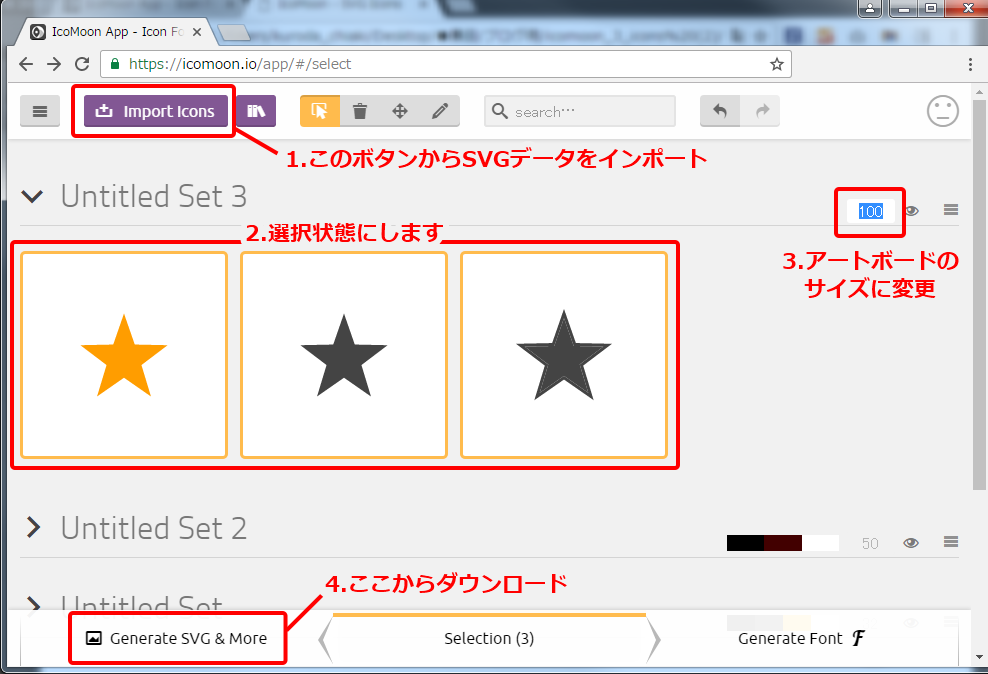
DLするといろいろなファイルが格納されています。
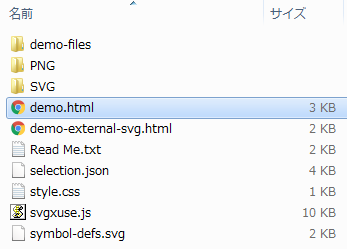
その中の、demo.htmlをブラウザで開いてみましょう。
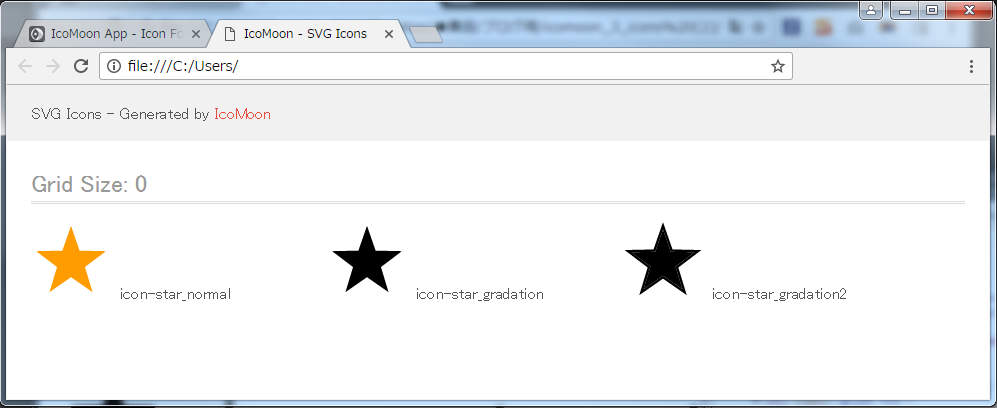
おっと。
グラデーションを使った星が真っ黒になっています。
ジェネレーターにアップロードした時点で真っ黒になっていましたが、
ポジティブな私は、「一時的に黒くなっているだけ、DLしたらきっと平気。」と思っていたので、ブラウザで表示した瞬間ショックでした。
グラデーションが再現できないなんて、SVGは使えないのか...
しかし、最初にSVGを書き出して開いた時は、ちゃんとグラデーションが表示されていたはず。
どうにか表示できないものでしょうか。。。
、、きっとできるはず!
3, グラデーションを復元
まずdemo.htmlのコードを見てみます。
demo.html
...

<body>
<svg style="position: absolute; width: 0; height: 0; overflow: hidden;" version="1.1" xmlns="http://www.w3.org/2000/svg" xmlns:xlink="http://www.w3.org/1999/xlink">
  <defs>
    <symbol id="icon-star_normal" viewBox="0 0 100 100">
      <title>star_normal</title>
      <path class="path1" fill="#ff9d00" d="M50 8.51l10.78 31.030 32.84 0.67-26.17 19.84 9.51 31.44-26.96-18.76-26.96 18.76 9.51-31.44-26.17-19.84 32.84-0.67 10.78-31.030z"></path>
    </symbol>
    <symbol id="icon-star_gradation" viewBox="0 0 100 100">
      <title>star_gradation</title>
      <path class="path1" d="M50 8.51l10.78 31.030 32.84 0.67-26.17 19.84 9.51 31.44-26.96-18.76-26.96 18.76 9.51-31.44-26.17-19.84 32.84-0.67 10.78-31.030z"></path>
    </symbol>
    <symbol id="icon-star_gradation2" viewBox="0 0 100 100">
      <title>star_gradation2</title>
      <path class="path1" d="M38.14 38.060l-36.14 0.73 28.81 21.82-10.46 34.57 29.65-20.63 29.65 20.63-10.46-34.57 28.81-21.82-36.11-0.74-11.89-34.11zM74.27 87.79l-24.27-16.89-24.28 16.89 8.56-28.31-23.56-17.86 29.57-0.62 9.71-27.92 9.71 27.92 29.57 0.6-23.57 17.88z"></path>
      <path class="path2" d="M74.27 87.8l-24.27-16.9-24.28 16.9 8.56-28.31-23.56-17.87 29.57-0.62 9.71-27.92 9.71 27.92 29.57 0.6-23.57 17.89z"></path>
    </symbol>
  </defs>
</svg>
<header class="bgc1 clearfix">

...
これがsvgスプライトの構造なんですね。
最初は、見慣れないタグや数字の羅列が辛かったですが、半日ほど試行錯誤を繰り返した私は、もうすっかり馴染みのコードとなりました。
結合する前後で比較してみると、 <linearGradient> が消えています。
単体のSVGコードに習って、グラデーション情報を追加してみました。
...

<body>
<svg style="position: absolute; width: 0; height: 0; overflow: hidden;" version="1.1" xmlns="http://www.w3.org/2000/svg" xmlns:xlink="http://www.w3.org/1999/xlink">
+  <linearGradient id="a" x1="2.03" y1="49.56" x2="97.97" y2="49.56" gradientUnits="userSpaceOnUse"><stop offset="0" stop-color="#fff538"/><stop offset="0.2" stop-color="#fff538"/><stop offset="0.8" stop-color="#ff7800"/><stop offset="1" stop-color="#ff7800"/></linearGradient>
+  <linearGradient id="b" x1="50" y1="87.8" x2="50" y2="13.08" gradientUnits="userSpaceOnUse"><stop offset="0.2" stop-color="#fff538"/><stop offset="0.8" stop-color="#ff7800"/></linearGradient>
  <defs>
    <symbol id="icon-star_normal" viewBox="0 0 100 100">
      <title>star_normal</title>
      <path class="path1" fill="#ff9d00" d="M50 8.51l10.78 31.030 32.84 0.67-26.17 19.84 9.51 31.44-26.96-18.76-26.96 18.76 9.51-31.44-26.17-19.84 32.84-0.67 10.78-31.030z"></path>
    </symbol>
    <symbol id="icon-star_gradation" viewBox="0 0 100 100">
      <title>star_gradation</title>
      <path class="path1" d="M50 8.51l10.78 31.030 32.84 0.67-26.17 19.84 9.51 31.44-26.96-18.76-26.96 18.76 9.51-31.44-26.17-19.84 32.84-0.67 10.78-31.030z"></path>
    </symbol>
    <symbol id="icon-star_gradation2" viewBox="0 0 100 100">
      <title>star_gradation2</title>
      <path class="path1" d="M38.14 38.060l-36.14 0.73 28.81 21.82-10.46 34.57 29.65-20.63 29.65 20.63-10.46-34.57 28.81-21.82-36.11-0.74-11.89-34.11zM74.27 87.79l-24.27-16.89-24.28 16.89 8.56-28.31-23.56-17.86 29.57-0.62 9.71-27.92 9.71 27.92 29.57 0.6-23.57 17.88z"></path>
      <path class="path2" d="M74.27 87.8l-24.27-16.9-24.28 16.9 8.56-28.31-23.56-17.87 29.57-0.62 9.71-27.92 9.71 27.92 29.57 0.6-23.57 17.89z"></path>
    </symbol>
  </defs>
</svg>
<header class="bgc1 clearfix">

...
次に、追加したグラデーション情報とパスの情報を紐付けます。
こちらも、単体のSVGコードに習いましょう。 id と fill:url(#) を使います。
ついでに、<path>にあったclass="path1", class="path2"という記述は今回使わないので消しました。
...

<body>
<svg style="position: absolute; width: 0; height: 0; overflow: hidden;" version="1.1" xmlns="http://www.w3.org/2000/svg" xmlns:xlink="http://www.w3.org/1999/xlink">
  <linearGradient id="gradient-line" x1="2.03" y1="49.56" x2="97.97" y2="49.56" gradientUnits="userSpaceOnUse"><stop offset="0" stop-color="#fff538"/><stop offset="0.2" stop-color="#fff538"/><stop offset="0.8" stop-color="#ff7800"/><stop offset="1" stop-color="#ff7800"/></linearGradient>
  <linearGradient id="gradient-main" x1="50" y1="87.8" x2="50" y2="13.08" gradientUnits="userSpaceOnUse"><stop offset="0.2" stop-color="#fff538"/><stop offset="0.8" stop-color="#ff7800"/></linearGradient>
  <defs>
    <symbol id="icon-star_normal" viewBox="0 0 100 100">
      <title>star_normal</title>
      <path fill="#ff9d00" d="M50 8.51l10.78 31.030 32.84 0.67-26.17 19.84 9.51 31.44-26.96-18.76-26.96 18.76 9.51-31.44-26.17-19.84 32.84-0.67 10.78-31.030z"></path>
    </symbol>
    <symbol id="icon-star_gradation" viewBox="0 0 100 100">
      <title>star_gradation</title>
      <path fill="url(#gradient-main)" d="M50 8.51l10.78 31.030 32.84 0.67-26.17 19.84 9.51 31.44-26.96-18.76-26.96 18.76 9.51-31.44-26.17-19.84 32.84-0.67 10.78-31.030z"></path>
    </symbol>
    <symbol id="icon-star_gradation2" viewBox="0 0 100 100">
      <title>star_gradation2</title>
      <path fill="url(#gradient-line)" d="M38.14 38.060l-36.14 0.73 28.81 21.82-10.46 34.57 29.65-20.63 29.65 20.63-10.46-34.57 28.81-21.82-36.11-0.74-11.89-34.11zM74.27 87.79l-24.27-16.89-24.28 16.89 8.56-28.31-23.56-17.86 29.57-0.62 9.71-27.92 9.71 27.92 29.57 0.6-23.57 17.88z"></path>
      <path fill="url(#gradient-main)" d="M74.27 87.8l-24.27-16.9-24.28 16.9 8.56-28.31-23.56-17.87 29.57-0.62 9.71-27.92 9.71 27.92 29.57 0.6-23.57 17.89z"></path>
    </symbol>
  </defs>
</svg>
<header class="bgc1 clearfix">

...
このように書き換えたら、demo.htmlをブラウザでもう一度開いてみましょう。
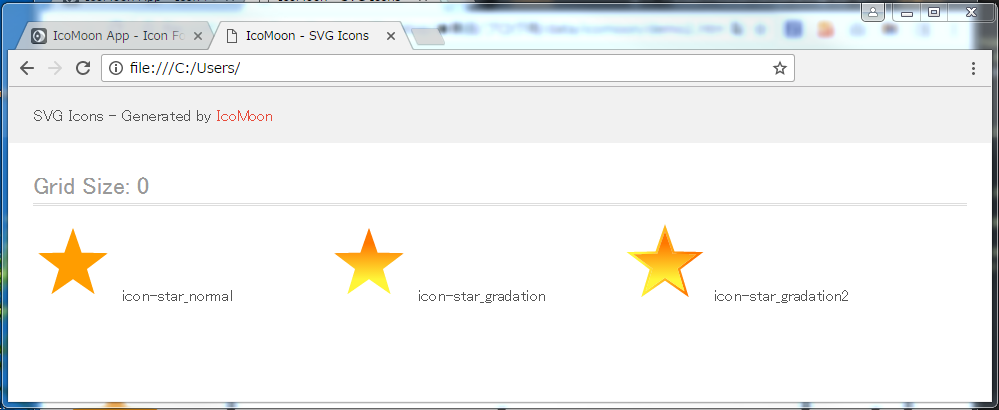
おお\(^^)/ SVGスプライトでもグラデーションを表示することができましたね!
demo.htmlで調整したコードは、<svg>の部分だけ取り出して、使いたいhtmlファイルの<body>直下にコピペします。
後は、html内でSVGを呼び出すだけ!
<svg>にwidth, heightをつければ、サイズも自在に変更可能です。
html
<svg width="10" height="10">
  <use xlink:href="#icon-star_gradation2"></use>
</svg>

<svg width="100" height="100">
  <use xlink:href="#icon-star_gradation2"></use>
</svg>

<svg width="200" height="200">
  <use xlink:href="#icon-star_gradation2"></use>
</svg>

4, SVGスプライトを使うときに気をつけたいこと
ついでにもう少し、SVGデータを整えます。
今回作ったグラデーション画像の場合は当てはまりませんが、アイコンなどの単色画像は色を変えたいという事があったりしますよね!
SVGの利点として、CSSで色を変えられる事があげられますが、残念ながら今のままではCSSを指定しても反映されません。
<path>にfillが直接記述されている場合は、cssでfillを指定しても反映されないようです。
そのため、<path>のfillは消してしまい、CSSで指定できる環境を準備しておくと便利です!
svg
...

<symbol id="icon-star_normal" viewBox="0 0 100 100">
  <title>star_normal</title>
  <path d="M50 8.51l10.78 31.030 32.84 0.67-26.17 19.84 9.51 31.44-26.96-18.76-26.96 18.76 9.51-31.44-26.17-19.84 32.84-0.67 10.78-31.030z"></path>
</symbol>

...
CSS
.pink {
  fill: #fa5cb2;
}
.blue {
  fill: #0c80e2;
}
html
<svg class="pink" width="200" height="200">
  <use xlink:href="#icon-star_normal" />
</svg>
<p>class="pink"</p>

<svg class="blue" width="200" height="200">
  <use xlink:href="#icon-star_normal" />
</svg>
<p>class="blue"</p>

SVGスプライトを導入してから、色の変更、サイズの変更も自由自在で快適です! おまけにRetinaディスプレイで表示してもキレイです!
こんな画像の扱い方ができるなんて、感動ですね!
画像を追加するときも、既にあるsvgのコードの中に<symbol>~</symbol>をペッと挿入するだけ!なんて簡単なのでしょうか!!
「もっと前から使っていればよかった、、!」
いえいえ、使いたくても古いブラウザは対応していなかったんで使えなかったんですよね。。
しかし、昨今のブラウザシェアの状況はこの通り。
機は熟しましたね!
満を持してSVGデビューを果たしましょう\(^^)/
次は渡部くんの記事です!